What is a DIY Kitchen Decor Rack
A DIY kitchen decor rack is a fantastic project that allows you to blend functionality with your personal style. It is essentially a storage or display unit you create yourself, specifically designed to organize and showcase items in your kitchen. This can range from simple shelves for spices and cookbooks to more elaborate racks for pots, plates, or even wine bottles. The beauty of a DIY project lies in its flexibility. You can customize the size, materials, and design to perfectly suit your kitchen’s unique layout and aesthetic. Moreover, it’s a rewarding way to add a personal touch to your home while often saving money compared to buying a pre-made solution.
Benefits of a DIY Kitchen Decor Rack
Enhances Kitchen Aesthetics

One of the primary advantages of a DIY kitchen decor rack is its ability to elevate the visual appeal of your kitchen. By choosing materials, finishes, and designs that complement your existing decor, you can create a cohesive and stylish space. A well-designed rack can serve as a focal point, adding character and personality. Whether you opt for a rustic, modern, or farmhouse style, a DIY project lets you tailor the rack to reflect your unique taste. Consider incorporating decorative elements, such as plants, artwork, or vintage kitchenware, to further enhance the aesthetics. The right decor rack can transform a simple kitchen into a warm and inviting hub.
Maximizes Space
In kitchens, especially those with limited space, a DIY decor rack is an excellent way to maximize storage potential. By utilizing vertical space, you can free up valuable countertop and cabinet areas. A strategically placed rack can hold a variety of items, from pots and pans to spices and utensils. This not only keeps your kitchen organized but also makes it easier to find what you need. Customizing the dimensions of your rack ensures it fits perfectly into your available space, whether it’s a small corner, a narrow wall, or above your sink. This tailored approach is often more effective than standard storage solutions.
Cost-Effective
DIY projects are often a more budget-friendly alternative to purchasing ready-made furniture. Building your own kitchen decor rack allows you to control the costs by selecting affordable materials and completing the construction yourself. You can often find reclaimed wood or repurposed items, further reducing expenses. Additionally, you can adjust the design and materials to fit your budget. While the initial investment might involve purchasing some tools, these can be used for future projects, providing long-term savings. A DIY approach provides a cost-effective way to enhance both the functionality and appearance of your kitchen without breaking the bank.
Top 7 DIY Kitchen Decor Rack Ideas

Floating Shelf Decor Rack
Floating shelves are a classic and versatile option for kitchen decor. They can be installed almost anywhere, offering a clean, modern look. Use them to display cookbooks, decorative bowls, or small plants. The simplicity of the design makes it easy to build, and you can customize the size and finish to match your kitchen’s style. For a more rustic feel, opt for reclaimed wood; for a sleek, modern look, choose painted or stained wood. They are relatively easy to install, making them perfect for beginners, and can dramatically improve the look of your kitchen. Consider varying the shelf lengths for visual interest.
Materials and Tools Needed
Materials include wood planks (pine, oak, or your choice), shelf brackets (hidden or visible), screws, wood stain or paint, and sandpaper. Tools needed include a saw (circular saw or hand saw), drill, measuring tape, level, and screwdriver.
Step-by-Step Guide

Measure and cut the wood planks to the desired lengths. Sand the edges and surfaces smooth. Apply stain or paint according to the manufacturer’s instructions and allow to dry completely. Install the shelf brackets on the wall, ensuring they are level. Attach the shelves to the brackets, and your floating shelf decor rack is ready to use. Don’t forget to pre-drill holes to prevent the wood from splitting when screwing in the brackets.
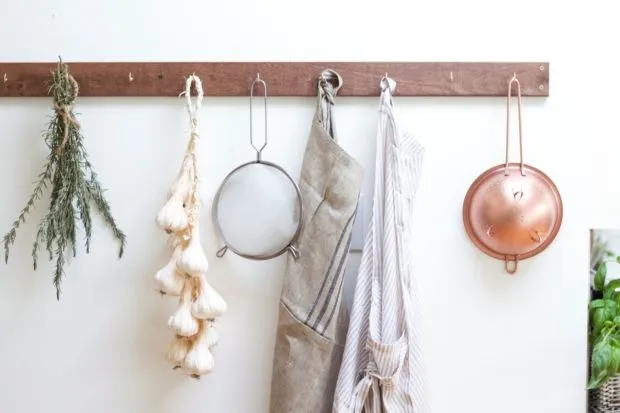
Hanging Pot Rack
A hanging pot rack is a practical and stylish solution for storing pots and pans, freeing up cabinet space and adding a touch of professional kitchen design. These racks come in various styles, from simple rods to more elaborate grid designs. You can hang them from the ceiling or mount them on the wall, depending on your kitchen layout and available space. They’re perfect for showcasing your cookware while keeping it within easy reach. Consider the weight capacity when choosing materials and ensure the mounting hardware is secure to prevent accidents. This is particularly useful in smaller kitchens where storage space is at a premium.
Materials and Tools Needed
Materials include metal rods or a pre-made pot rack frame, hooks for hanging pots and pans, chains or mounting hardware, and screws. Tools needed are a drill, measuring tape, level, and safety glasses.
Step-by-Step Guide

If building your own, measure and cut the metal rods to the required lengths. Assemble the frame, ensuring it is sturdy and secure. Attach the chains or mounting hardware to the ceiling or wall, making sure it can support the weight of your pots and pans. Hang the pot rack from the chains or mount it directly to the wall, using a level to ensure it hangs straight. Attach the hooks and hang your pots and pans. Always double-check the stability before loading the rack.
Spice Rack with a Twist
Spice racks are essential for keeping your herbs and spices organized and easily accessible. A DIY spice rack allows you to customize the size, design, and materials to fit your specific needs and aesthetic preferences. You can create a simple shelf-style rack, a wall-mounted rack, or even a rack that fits inside a cabinet door. Consider adding a chalkboard panel to label the spices, making it both functional and decorative. A well-designed spice rack can transform a cluttered spice collection into an organized and attractive display, adding both convenience and style to your cooking space. Experiment with different designs to find the perfect fit for your kitchen.
Materials and Tools Needed
Materials include wood (pine, plywood), small nails or screws, wood glue, sandpaper, stain or paint, and optional chalkboard paint. Tools include a saw, drill, measuring tape, level, and a hammer or screwdriver.
Step-by-Step Guide

Cut the wood pieces to the appropriate sizes for the shelves and frame. Assemble the frame using wood glue and nails or screws. Sand the entire rack to ensure a smooth finish. Apply stain or paint, or use chalkboard paint for a labeling surface. Mount the rack on the wall or inside a cabinet, ensuring it is level and secure. Add your spices and enjoy your beautifully organized kitchen.
Utensil Holder Decor Rack
A utensil holder rack is a practical and stylish way to keep your cooking utensils within easy reach. This can be as simple as a wooden box with dividers or a more elaborate design with hooks or compartments. You can place it on the countertop or mount it on the wall, depending on your kitchen layout and preferences. Consider incorporating decorative elements, such as vintage jars, painted finishes, or personalized labels, to enhance its appeal. This type of rack not only keeps your utensils organized but also adds a charming touch to your kitchen decor, making cooking and cleaning up more convenient. The use of repurposed materials, such as old tin cans, adds a unique flair.
Materials and Tools Needed
Materials can include wood, metal, or repurposed containers, wood glue, screws, hooks, and paint or stain. Tools needed include a saw, drill, measuring tape, and a screwdriver.
Step-by-Step Guide

If using wood, cut the pieces to form the box or frame. Assemble the frame using glue and screws. If using repurposed containers, ensure they are clean and dry. Attach hooks or dividers as needed to organize the utensils. Paint or stain the rack and let it dry completely. Mount it on the wall or place it on the countertop, and fill it with your utensils. Remember to securely attach any hanging hardware for safety.
Plate Rack Decor Display
Plate racks are a charming addition to any kitchen, providing a stylish way to display your favorite plates and dishes. They can be designed as freestanding units or wall-mounted displays. The racks can be made from wood, metal, or a combination of materials, and can be customized to fit your specific plate sizes and kitchen decor. Plate racks not only add a decorative element but also provide easy access to your dishes, making them a practical and beautiful addition to your kitchen. They add a touch of elegance and warmth to the kitchen space, offering a delightful display.
Materials and Tools Needed
Materials include wood for the frame and shelves, dowels or grooves to hold the plates, wood glue, screws, and paint or stain. Tools needed are a saw, drill, measuring tape, and a screwdriver.
Step-by-Step Guide

Cut the wood pieces to form the frame and shelves. Create grooves or add dowels to hold the plates securely. Assemble the frame and shelves using glue and screws. Sand the entire rack and apply paint or stain. Allow it to dry completely. Mount the rack on the wall or place it on a countertop and arrange your plates for an elegant display. Ensure the plate grooves are deep enough to prevent the plates from falling.
Wine Rack
A wine rack is a sophisticated and practical addition to any kitchen or dining area, providing a stylish way to store and display your wine collection. DIY wine racks come in various styles, from simple shelves to more elaborate designs that can hold several bottles. You can customize them to fit your specific space and aesthetic, choosing from materials like wood, metal, or even reclaimed items. A well-designed wine rack not only adds a decorative touch to your kitchen but also keeps your wine bottles organized and easily accessible, making it a perfect addition for wine enthusiasts. Ensure that the wine bottles are stored horizontally to keep the cork moist.
Materials and Tools Needed
Materials include wood for the frame and shelves, dowels, screws, wood glue, and paint or stain. Tools include a saw, drill, measuring tape, and a screwdriver.
Step-by-Step Guide
Cut the wood pieces to the appropriate size for the frame and shelves. Drill holes for the dowels, ensuring the spacing is correct for the wine bottles. Assemble the frame and shelves using glue and screws. Insert the dowels to support the bottles. Sand the rack and apply paint or stain. Let it dry completely before placing your wine bottles. Double-check the stability of the rack before placing the wine.
Repurposed Ladder Rack
Repurposing an old ladder into a kitchen decor rack is a creative and unique way to add rustic charm and functionality to your kitchen. The ladder can be placed against the wall and used to display various items, such as pots, pans, utensils, or even decorative items. It offers a vintage appeal and adds character to your kitchen. By simply cleaning, sanding, and possibly repainting or staining the ladder, you can create a functional and eye-catching decor element. The ladder’s rungs provide natural shelves, making it an easy DIY project. The unique aesthetic of a repurposed ladder adds a vintage charm to the kitchen.
Materials and Tools Needed
Materials include an old ladder, sandpaper, paint or stain (optional), and hooks or baskets for hanging items. Tools include sandpaper, a paintbrush or roller, and possibly a drill for adding hooks.
Step-by-Step Guide
Clean the ladder thoroughly and sand any rough surfaces. Apply paint or stain if desired, allowing it to dry completely. Position the ladder against a wall in your kitchen. Add hooks or baskets to the rungs to hang your items, such as pots, utensils, or decorative items. Ensure the ladder is stable and securely placed against the wall. This is a quick and easy way to add storage and display space, adding a unique look.
Choosing the Right Materials
Wood
Wood is a popular choice for DIY kitchen decor racks because of its versatility and aesthetic appeal. You can choose from various types of wood, each with its unique characteristics and appearance. Pine is a common and affordable option, perfect for beginners. Oak provides a more durable and elegant look, while reclaimed wood offers a rustic, eco-friendly charm. When selecting wood, consider its durability, the environment it will be in, and the desired aesthetic. Ensure the wood is properly treated and sealed to protect it from moisture and wear in the kitchen environment. The type of wood used also influences the stain or paint options.
Metal
Metal offers a sleek and modern look, making it an excellent choice for a contemporary kitchen. Metal racks can be constructed from various materials, including steel and iron. Metal racks are typically durable and can withstand the weight of heavy items like pots and pans. Consider using powder-coated metal for added durability and resistance to rust and scratches. When working with metal, ensure proper welding or joining techniques for a secure and stable rack. Metal is ideal for hanging racks and provides a minimalist aesthetic, often complementing stainless steel appliances.
Other materials
Besides wood and metal, you can explore other materials for your DIY kitchen decor rack. Consider using reclaimed materials such as pallets, ladders, or even repurposed furniture. These options add character and a unique touch to your kitchen. Glass shelves can provide a clean and modern aesthetic, while woven baskets can add texture and warmth. Be creative and experiment with different materials to find what best suits your kitchen’s style and your personal preferences. When selecting materials, always prioritize safety, durability, and the overall design of your kitchen.
Tips for Decorating Your DIY Kitchen Decor Rack
Color Coordination
Color coordination is crucial for creating a cohesive and visually appealing kitchen. Choose colors that complement your existing decor and create a harmonious look. Consider the colors of your cabinets, countertops, and appliances when selecting the finish for your DIY kitchen decor rack. Neutral colors, such as white, gray, or natural wood tones, often work well and provide a versatile backdrop for displaying items. If you want to add a pop of color, use accent colors to highlight specific items or add decorative elements. Pay attention to color combinations to ensure the rack enhances your kitchen’s overall aesthetic appeal.
Accessorizing
Accessorizing your DIY kitchen decor rack is an excellent way to personalize your space and add visual interest. Choose accessories that reflect your style and add functionality. Consider using decorative bowls, plants, cookbooks, or vintage kitchenware to create a visually appealing display. Mix and match different textures, shapes, and sizes to create a dynamic and engaging look. Arrange items in a balanced and organized manner to avoid a cluttered appearance. Regularly update your accessories to keep your decor fresh and reflect your changing tastes. The right accessories can transform a simple rack into a statement piece that reflects your personality.
Arrangement and Display
The arrangement and display of items on your DIY kitchen decor rack can significantly impact its aesthetic appeal. Consider the size, shape, and color of the items you are displaying. Arrange items in a visually balanced manner, using the rule of thirds or creating a focal point. Group similar items together to create a cohesive look, and leave some empty space to prevent a cluttered appearance. Vary the heights and textures of the items to add visual interest. Use your rack to tell a story about your cooking style and preferences. Regular rearranging keeps the look fresh and inviting. The way you arrange and display your items makes the difference between a practical storage solution and a design statement.
Maintaining Your DIY Kitchen Decor Rack
Maintaining your DIY kitchen decor rack ensures it remains both functional and beautiful for years to come. Regularly dust and clean the rack to prevent the build-up of dirt and grime. Use appropriate cleaning products based on the materials of your rack. Inspect the rack periodically for any signs of wear and tear, such as loose screws or damaged wood. If you find any issues, address them promptly to prevent further damage. Reapply stain or paint as needed to keep the rack looking its best. Proper maintenance helps extend the life of your rack and keeps your kitchen looking stylish and organized. The right care keeps your rack as functional as it is attractive.